

Introduction
Cracks in an epoxy floor are frustrating. You invested in a beautiful, durable surface. Now you see a crack running across it. The good news is that most epoxy floor cracks are fixable. You do not always need to call a professional.
This DIY repair guide is written specifically for homeowners, factory owners, and business operators in Pakistan. It covers everything — from identifying the type of crack to completing the repair step by step. Follow this guide carefully. Your floor will look great again.
Why Do Epoxy Floors Crack?
Before fixing anything, you need to understand why the crack happened. Different causes need different solutions. Repairing without understanding the cause means the crack will return.
1. Concrete Slab Movement
Epoxy flooring sits on top of a concrete slab. If the slab shifts, settles, or expands, the epoxy above it cracks. This is very common in Pakistan due to soil conditions, especially in cities like Lahore, Karachi, and Faisalabad where clay-heavy soil expands and contracts with moisture.
2. Poor Surface Preparation
If the concrete was not properly ground, cleaned, or primed before epoxy application, the coating loses adhesion over time. Weak adhesion leads to cracking and peeling — especially along edges and joints.
3. Thermal Expansion and Contraction
Pakistan experiences extreme temperature swings — very hot summers and cold winters. Concrete and epoxy expand and contract at different rates. This stress builds up over time and creates hairline cracks.
4. Heavy Load Impact
Dropping heavy machinery, equipment, or objects on an epoxy floor causes impact cracks. These are common in warehouses and industrial facilities. The force exceeds the epoxy layer’s flexibility and creates a visible fracture.
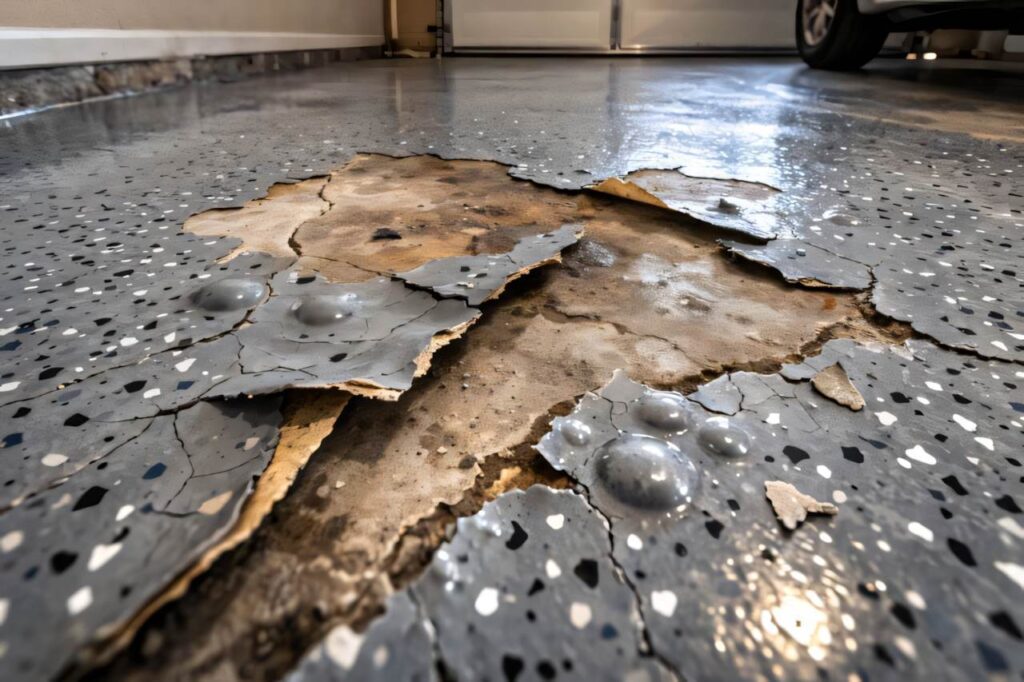
5. Moisture from Below
Water rising through the concrete slab — called hydrostatic pressure — pushes against the epoxy from underneath. This causes bubbling, lifting, and eventually cracking. It is a common issue in Pakistan, especially during monsoon season.
6. Low-Quality Epoxy Materials
Cheap or expired epoxy products have weak structural integrity. They crack earlier than premium-grade systems. Many DIY jobs in Pakistan use low-quality materials purchased from local hardware shops. These fail within months.
Types of Epoxy Floor Cracks
Not all cracks are the same. Identifying the crack type determines how you repair it.
Hairline Cracks
These are very thin surface cracks — less than 1mm wide. They look like fine lines on the surface. Hairline cracks are usually cosmetic. They do not indicate deep structural damage. They are the easiest to repair.
Surface Cracks (1mm–3mm)
These are slightly wider cracks confined to the epoxy layer. They have not yet reached the concrete below. They are repairable with epoxy crack filler.
Deep Structural Cracks (3mm and above)
These cracks go through the epoxy and into the concrete below. They indicate a more serious problem — either slab movement or structural stress. These require more work. In some cases, they need a professional assessment.
Edge and Joint Cracks
These appear along walls, expansion joints, or transitions between floors. They are very common and usually caused by differential movement between surfaces.
Tools and Materials You Need
Gather everything before you start. Stopping mid-repair to find a missing tool causes problems. Here is the complete list:
Tools:
- Angle grinder with diamond blade (for grinding crack edges)
- Wire brush or stiff bristle brush
- Vacuum cleaner or blower
- Putty knife or scraper
- Mixing sticks or electric drill with mixing paddle
- Plastic mixing cups
- Protective gloves and safety glasses
- Masking tape
- Clean cloth or rags
- Heat gun (optional, for drying)
Materials:
- Epoxy crack filler or injection-grade epoxy resin
- Epoxy primer (same brand as your existing floor if possible)
- Matching epoxy topcoat or touch-up kit
- Polyurethane sealant (for expansion joints)
- Acetone or epoxy floor cleaner (for surface prep)
- Fine sandpaper (120–220 grit)
Where to Buy in Pakistan: These materials are available at construction material markets in Lahore (Hall Road, Timber Market), Karachi (SITE area, Saddar), and Islamabad (Blue Area hardware shops). Some epoxy flooring companies like Unicorn Flooring also supply repair kits directly.
Step-by-Step DIY Epoxy Floor Crack Repair Guide
Follow these steps in order. Do not skip any step. Each one prepares the surface for the next stage.
Step 1 — Clean the Crack Thoroughly
Start by removing all dust, debris, oil, and loose material from inside and around the crack.
Use a stiff wire brush to scrub the inside of the crack. Then vacuum out all loose particles. Next, wipe the area with acetone on a clean cloth. This removes oil, grease, and any wax residue.
Allow the surface to dry completely. Do not rush this step. Moisture inside the crack will prevent the repair material from bonding. In humid weather, use a heat gun to dry the area.
Tip: In monsoon season in Pakistan, always check for moisture before proceeding. A simple moisture test — taping a plastic sheet over the crack for 24 hours — will show if moisture is rising from below.
Step 2 — Open the Crack (V-Groove Method)
This step surprises many people. You actually need to make the crack slightly wider before filling it. This is called V-grooving.
Use your angle grinder with a diamond blade. Carefully grind along the length of the crack to create a V-shaped channel. The groove should be about 3–5mm wide and 5–8mm deep.
Why do this? A V-groove gives the repair material more surface area to bond to. A hairline crack filled on the surface will fail quickly. A properly opened groove holds the repair for years.
After grinding, vacuum and clean the groove again. Remove all dust.
Step 3 — Apply Epoxy Primer
Mix the epoxy primer according to the manufacturer’s instructions. Use a small brush to apply primer inside the groove and on the surrounding surface — about 5cm on each side of the crack.
Allow the primer to become slightly tacky. Do not let it fully cure. The next layer bonds best to a tacky primer surface.
Priming ensures the filler material grips the concrete and existing epoxy coating. Skipping this step is one of the most common DIY mistakes.
Step 4 — Mix and Apply Epoxy Crack Filler
Now mix your epoxy crack filler. Most products come in two parts — resin and hardener. Mix them in the exact ratio specified on the packaging. Wrong ratios prevent proper curing.
Mix thoroughly for at least 3 minutes. The mixture should be uniform in color with no streaks.
Using a putty knife, press the filler firmly into the groove. Work it deep into the crack. Avoid air pockets. Overfill the crack slightly — the filler will shrink slightly as it cures.
Smooth the surface with the putty knife. Try to make it level with the surrounding floor.
For hairline cracks: Use a low-viscosity (thin) epoxy injection resin. It flows into the crack under its own weight. Apply it with a squeeze bottle and let it self-level.
For deep structural cracks: Apply filler in layers. Do not try to fill a deep crack in one pour. Each layer should cure before the next application.
Step 5 — Allow Full Cure Time
This is the most important step that DIYers in Pakistan consistently rush. Do not walk on the repair or proceed to the next step until the filler has fully cured.
Check the product datasheet for cure times. In Pakistan’s hot summer temperatures, epoxy cures faster. In winter, it takes longer. A general guideline:
- Initial cure (touch dry): 4–8 hours
- Light foot traffic: 12–24 hours
- Full mechanical cure: 48–72 hours
Keep the repaired area clean and protected during curing. Do not let dust or water settle on the wet surface.
Step 6 — Sand and Level the Repaired Area
Once fully cured, the filler may have slightly shrunk or raised above the floor level. Use 120-grit sandpaper to sand the repair until it is flush with the surrounding floor.
After sanding, clean all dust with a vacuum and wipe with a dry cloth. Inspect the repair. If you see any low spots or pinholes, apply a thin skim coat of filler and allow it to cure again.
Step 7 — Apply Matching Epoxy Topcoat
The repaired area will look different from the rest of the floor — it will be dull and the color may not match perfectly. You need to apply a topcoat to blend the repair.
Mix the matching epoxy topcoat and apply it over the repaired area using a small roller or brush. Feather the edges outward so the patch blends gradually into the surrounding floor.
For best results, apply the topcoat slightly beyond the repaired area — about 20–30cm in each direction. This creates a natural blend.
Allow the topcoat to cure according to the product instructions before resuming normal use.
Step 8 — Inspect and Protect
After full curing, inspect the repair under good lighting. Look at it from different angles. Run your hand over it. It should be smooth, level, and visually blended.
Apply an epoxy floor sealer or polish over the entire floor if the repair looks noticeably different from the surrounding area. This refreshes the whole floor and creates a uniform finish.
Going forward, protect your floor from the causes that created the crack in the first place.
Common DIY Mistakes to Avoid
Many people in Pakistan attempt epoxy floor crack repairs and fail. Here are the mistakes that cause repairs to fail:
Not cleaning the crack properly. Dust and oil prevent bonding. The repair lifts within weeks.
Skipping the V-groove step. Surface-only repairs do not last. The crack reappears quickly.
Using the wrong ratio of resin to hardener. Incorrect mixing ratios result in a soft, sticky filler that never properly cures.
Rushing the cure time. Walking on uncured epoxy damages the repair permanently.
Using mismatched products. Using a different brand or system for the repair creates compatibility issues. Always try to match the original floor system.
Ignoring the root cause. If the crack is caused by a structural problem, cosmetic repair will not solve it. The crack will return.
When Should You Call a Professional?
DIY repair works well for hairline and surface cracks. However, some situations require a professional. Know when to stop and call an expert.
Call a professional when:
- The crack is wider than 5mm and keeps growing
- Multiple cracks appear across a large area
- The floor shows signs of lifting, bubbling, or delamination
- Moisture is visibly rising through the floor
- The crack runs along structural joints or load-bearing areas
- The floor is in an industrial or high-traffic commercial facility where failure has safety implications
In Pakistan, Unicorn Flooring provides professional epoxy floor crack repair and restoration services. They assess the root cause, not just the surface symptom. Their repair work comes with warranty coverage and long-term durability.
Epoxy Floor Crack Repair Cost in Pakistan
For those curious about professional repair costs, here is a general estimate:
| Repair Type | Estimated Cost (Pakistan) |
|---|---|
| Hairline crack repair (per running foot) | PKR 150–300 |
| Surface crack repair (per running foot) | PKR 250–500 |
| Deep structural crack repair (per running foot) | PKR 500–1,000+ |
| Full floor restoration (per sq ft) | PKR 60–150+ |
These are approximate figures. Actual costs depend on crack severity, location, floor type, and contractor.
DIY repair using materials purchased locally costs significantly less. A basic crack filler kit for a small repair can cost between PKR 1,500–5,000 depending on quality and quantity.
How to Prevent Epoxy Floor Cracks in the Future
Prevention is always better than repair. Follow these practices to keep your epoxy floor crack-free:
Use premium materials from the start. Quality epoxy systems resist cracking far better than cheap alternatives.
Ensure proper surface preparation. Correct grinding, moisture testing, and priming before installation prevents most premature failures.
Allow expansion joints. In large floor areas, expansion joints allow the concrete to move without stressing the epoxy above.
Avoid dropping heavy objects. Use rubber mats or protective boards in areas where heavy items are moved regularly.
Control moisture. Apply a moisture barrier primer on concrete slabs with high moisture content before epoxy installation.
Schedule regular maintenance. Inspect your epoxy floor every 6 months. Address small cracks immediately before they grow.
Conclusion
Cracked epoxy floors are a common problem in Pakistan. However, they are not a disaster. With the right tools, materials, and technique — most cracks are fully repairable at home.
This guide walked you through every step of epoxy floor crack repair in Pakistan — from understanding the cause to completing a lasting fix. Follow each step carefully. Do not rush. And always address the root cause, not just the surface crack.
For small hairline cracks, DIY is your best and most affordable option. For serious damage, structural cracks, or full floor restoration — trust a professional. Unicorn Flooring offers expert epoxy floor crack repair and restoration services across Pakistan with reliable results and warranty support.
Take care of your epoxy floor today. It will take care of you for many years to come.
FAQ’S
Can I repair an epoxy floor crack myself in Pakistan?
Yes. Hairline and surface cracks are well within DIY capability. Follow the steps in this guide carefully. For deep structural cracks or large damaged areas, professional help is recommended.
What is the best epoxy crack filler available in Pakistan?
Look for two-component epoxy injection resins or epoxy putty at construction markets in Lahore, Karachi, and Islamabad. Some flooring companies like Unicorn Flooring also supply professional-grade repair kits.
How long does an epoxy floor crack repair last?
A properly done repair — with V-grooving, priming, correct filler ratio, and full cure time — can last 5–10 years. Poor repairs last only weeks.
Why does my epoxy floor keep cracking after repair?
The root cause has not been addressed. If the concrete slab is moving, moisture is rising, or heavy loads are damaging the surface repeatedly, the crack will return regardless of repairs.
Is epoxy floor crack repair expensive in Pakistan?
DIY repair is very affordable — typically PKR 1,500–5,000 for materials. Professional repair costs more but offers longer-lasting results with warranty coverage.
Can cracks in epoxy flooring be fully invisible after repair?
With careful color matching and topcoat application, repairs can be made nearly invisible. Exact results depend on the age and condition of the surrounding floor.